Video Editing Software
Video editing software for creators in 2026 covers a wide range: timeline editors, color tools, audio workflows, and effects pipelines. The practical differences show up in export behavior, media handling, and how reliably the software tracks color and sound across multiple formats. A measurable starting point is frame-rate handling: most creator workflows target 24, 25, 30, 50, or 60 fps, and mismatches can cause judder or audio drift when the timeline and source frame rates disagree.
Another measurable factor is codec support. H.264 and H.265/HEVC dominate delivery formats, while many cameras record in ProRes, DNxHR, AV1, or vendor-specific variants. If your editor struggles with one of those inputs, you will spend time transcoding, and transcoding can change bitrate, chroma subsampling, or metadata.
Problems Or Pain Points
Creators often get wrong results from hidden dependencies: the editor’s decoder, the OS codec stack, GPU drivers, and the project’s color management settings. When those pieces disagree, you see symptoms like washed highlights, shifted skin tones, or banding in gradients. Those artifacts can come from incorrect color space tags, limited-range vs full-range YUV handling, or effects that run in a different color pipeline than the rest of the timeline.
Audio problems also show up as “it sounds fine in the preview” until export. That mismatch can happen when the editor uses different resampling paths for preview playback versus final render, or when variable frame rate (VFR) footage is conformed to a constant frame rate timeline. VFR is common in some phone recordings, and the result can be subtle drift that becomes obvious after 10–20 minutes of editing.
Skip the timer apps. They add one more thing to manage.
Another pain point is media management. Editors that ingest files by copying can duplicate storage, while editors that “link” to original media can break projects when drives are moved. Cache corruption and stale proxy references can also cause missing thumbnails or sudden re-transcoding, which costs time and can introduce generation loss if you export proxies with lossy settings.
Color management failures are common.
Tips And Recommendations
Match Your Editor To Your Camera Codec
Choose software that can decode your camera’s actual codec without constant transcoding. In practice, import 10–30 seconds of your real footage, then scrub frame-by-frame and play at full resolution. If playback stutters or the editor forces a conform step every time you open the project, you will lose time later.
Look for clear codec documentation and test results. Some editors handle H.265 better than others, and some handle ProRes variants more reliably on specific OS versions. If you must transcode, transcode once into a high-quality intermediate and keep the original files archived.
Do not trust marketing claims.
As a concrete workflow, many creators use a mezzanine intermediate with high bitrate and 10-bit support, then edit from that. The measurable outcome you want is stable playback and consistent color tags across the timeline.
Start with 10 seconds.
Use Proxies With Intent, Not Habit
Proxies reduce decoding load, but they can also introduce mismatches if you generate them with different color settings or if the editor swaps proxy and original incorrectly. Generate proxies from the same source files you will edit, and keep a consistent proxy-to-original mapping.
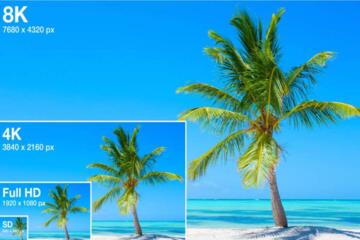
In practice, set proxy resolution based on your timeline needs. For 4K delivery, 1080p proxies often keep motion smooth while preserving enough detail for cuts and basic effects. If you do heavy motion graphics or fine text work, you may need 2K proxies to avoid edge softness.
Proxies can drift.
Before a long edit, export a short segment twice: once using proxies and once using originals. Compare waveform alignment and check for color shifts in skin tones. That comparison catches the “it looks fine in the timeline” problem.
Verify audio sync.
Prioritize Color Management And HDR Awareness
Pick an editor with transparent color management behavior. You want to know how it interprets input color space tags, how it maps to your timeline working space, and how it exports SDR or HDR. If your footage is 10-bit and you grade it, confirm that the editor preserves 10-bit precision through the grading pipeline.
In practice, test with a short clip containing bright highlights and dark shadows. Export in your target format and inspect for banding and highlight roll-off. Banding often appears when gradients get quantized after an incorrect color transform.
Color tags can lie.
For HDR workflows, confirm whether the editor supports HDR metadata handling and tone mapping. Many creators avoid HDR until the final stage because preview tone mapping can differ from final output, which makes grading decisions harder.
Check 10-bit paths.
Build A Reliable Audio Workflow
Audio quality depends on more than loudness. Choose software that supports waveform editing, clip gain, noise reduction tools, and consistent resampling. If you record dialogue, check that the editor handles sample rates correctly and does not resample in a way that changes timing.
A practical test is to import a clip with a known reference tone or a clapper slate, then export and compare alignment in a waveform viewer. If the editor shifts audio by a few milliseconds, you will notice it in multi-cam edits.
Waveforms reveal drift.
For creators who mix music and voice, a timeline with track-based mixing and automation curves helps. If you use external audio tools, confirm round-trip behavior and whether the editor maintains timecode and sync markers.
Export a 30-second test..
Case Examples
Scenario 1: 4K H.265 Phone Footage For Short-Form
A creator records 4K H.265 clips on a phone that uses variable frame rate. They import into an editor, then notice audio drift after long scrubbing. They generate 1080p proxies from the original files, set the timeline to match the intended delivery frame rate, and export a 60-second test. The drift disappears after conforming VFR correctly, and the creator keeps the original media archived.
Scenario 2: Multi-Cam Interview With Color Consistency
A creator edits a two-camera interview where one camera records 10-bit log and the other records a different log profile. They set up a color-managed workflow and test a 10-second grade segment, then compare exports on two displays. They adjust the timeline working space and confirm that the editor preserves 10-bit grading through export. The final cut avoids banding in the background gradient and keeps skin tones consistent across both cameras.
Comparison Table Or Checklist
| Decision Area | What To Check | Pass Signal | Fail Signal |
|---|---|---|---|
| Codec Handling | Import your real camera clip | Smooth playback without repeated conform | Stutter, forced transcoding every open |
| Audio Sync | Export a 30–60s segment | Waveform alignment matches timeline | Drift after export, resampling artifacts |
| Color Pipeline | Grade a highlight + shadow test clip | No banding, consistent skin tones | Washed highlights, posterization |
| Render Time | Time a 5–10s effect stack render | Predictable time per minute of footage | Render explodes with small edits |
| Media Management | Move project to another drive | Relinks correctly, no missing clips | Broken links, proxy mismatch |
Step-by-step checklist
- Pick 3 clips: one H.264 or H.265, one log/10-bit, one with dialogue.
- Create a new project with your intended timeline frame rate and audio sample rate.
- Import, then scrub at full resolution for 20 seconds.
- Generate proxies only if playback fails, and keep proxy settings consistent.
- Apply your most common effect stack to a 10-second segment.
- Export a 30–60 second review file and compare audio sync and color.
- Move the project folder to a different drive and reopen it.
Only then choose your editor.
Common Mistakes
Creators often test with demo clips instead of their own footage. Demo footage rarely matches your camera’s exact codec profile, bit depth, or color tags, so the editor’s real decoding path stays untested.
Another mistake is grading in a timeline that silently changes color space. When the editor auto-converts without clear visibility, you can end up with double transforms that flatten contrast. The fix is to set a known working space and verify export behavior with a test clip.
Skip the “default export.”
Many editors also fail when proxies are generated with different frame rates or when the timeline uses a different frame rate than the source. That mismatch can create subtle timing shifts that show up as lip-sync errors.
Creators sometimes ignore GPU driver updates. A driver update can fix decoding bugs, but it can also break hardware acceleration paths, so you should update drivers in a controlled way and retest your 10-second effect stack after changes.
FAQ
Which Video Editing Software Handles H.265 Smoothly In 2026?
H.265 performance depends on your OS, GPU, and the exact camera profile. Test by importing a 10–30 second H.265 clip from your camera, then scrub and export a short segment. If the editor repeatedly transcodes or stutters, switch to a high-quality intermediate or choose software with stronger H.265 decoding on your platform.
Do I Need Proxies For 4K Footage?
Proxies help when your system cannot decode 4K in real time during editing. Generate proxies only if playback stutters, and compare a 30–60 second export using proxies versus originals to confirm audio sync and color consistency. Many workflows use 1080p proxies for 4K delivery, but text-heavy motion may need higher proxy resolution.
How Do I Prevent Audio Drift After Export?
Audio drift often comes from variable frame rate footage or mismatched timeline settings. Conform the timeline to the intended frame rate, avoid mixing VFR and constant frame rate sources without checking, and export a short waveform-aligned test segment. If drift appears, re-encode the source to a constant frame rate intermediate and retest.
What Color Settings Should I Use For Log Footage?
Use a consistent color management workflow: confirm how the editor interprets input tags, set a known timeline working space, and verify that grading preserves 10-bit precision when your footage is 10-bit. Export a short highlight-and-shadow test clip and inspect for banding and skin-tone shifts on at least two displays.
Which Export Settings Work Best For Creator Deliveries?
Most creator deliveries accept H.264 or H.265 in MP4, but the best settings depend on your target platform’s requirements for frame rate, resolution, bitrate, audio codec, and color metadata. Export a 1–2 minute test using your intended settings, then review on the devices you care about. If the platform changes color appearance, adjust color metadata handling in the editor.
Author's Insight
Video editing software selection in 2026 should start with reproducible tests: import your real clips, verify audio sync after export, and check color behavior with a highlight/shadow test. Many “quality” complaints trace back to codec handling, color tag interpretation, and frame rate conformance rather than the editor’s effects features. A practical approach is to measure render time for your effect stack on a 10-second segment and to keep a backup export review each editing day.
Small setup choices matter.
Key Takeaways
Pick an editor that decodes your camera codec reliably, keeps audio aligned after export, and preserves color intent through grading. Use proxies only when playback performance requires them, and validate proxy-to-original mapping with short exports. Confirm render time for your effect stack, then lock your project template so frame rate and color settings stay consistent.
Next steps: run the checklist with 3 clips, export a 30–60 second review, and reopen the project after moving it to another drive. If you see persistent audio drift, banding, or color shifts that do not resolve after template and proxy adjustments, switch software or transcode to a known intermediate and retest.