Screen Recording Basics
Screen recording software captures video of your desktop, plus optional audio from your microphone and system sounds. The output usually lands as MP4, MKV, or WebM, and the choice affects playback compatibility and editing workflows.
For tutorials, you often need crisp cursor movement and a stable frame rate. For troubleshooting, you need reliable audio capture and a way to mark or zoom into the problem area. For documentation, you may care more about repeatable settings than about visual polish.
Most tools also support overlays such as a webcam window, a title card, or a watermark. Some add hotkeys for pause, resume, and region capture, which matters when you need to record only a specific window rather than the whole screen.
One practical example: recording a software bug report. You typically want to capture the exact app window, include system audio if the app plays sound, and keep the microphone on for narration. If the tool records at a variable frame rate, UI animations can look jittery in the final clip, which makes it harder for others to follow steps.
Another example: creating a short how-to for a health portal. You may need to blur sensitive fields, or at least pause recording while you type personal information. Many recorders offer region selection, but fewer offer reliable redaction, so you may need a separate workflow.
Common Pain Points
People often pick a recorder based on a single feature like “high quality,” then discover the tool fails at the task they actually need. The most frequent mismatch involves audio routing, frame rate stability, and file size.
Audio routing depends on how the operating system exposes “system audio” versus microphone input. On Windows, system audio capture often uses a driver or a capture API; on macOS, it can rely on Screen Recording permissions and audio capture settings. If the recorder captures the wrong device, you get silence or echo, and the video becomes hard to interpret.
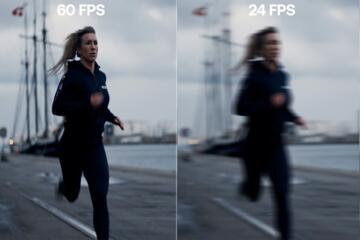
Frame rate stability depends on the encoder and the computer load. A recorder that targets 60 fps can still produce dropped frames when the CPU or GPU is busy. The result looks like stutter during mouse movement or scrolling, which is exactly when viewers need clarity.
File size surprises come from bitrate choices. Higher bitrate improves detail but increases storage and upload time. A 10-minute capture at a high bitrate can exceed several gigabytes, which can break workflows that rely on email attachments or limited cloud quotas.
Supporting technologies matter: hardware video encoders (such as GPU-based H.264/H.265 paths), screen capture APIs, and audio capture backends. When a tool falls back to software encoding, CPU usage can spike and the recording can lag behind real time—an issue that’s easy to miss until you review the clip.
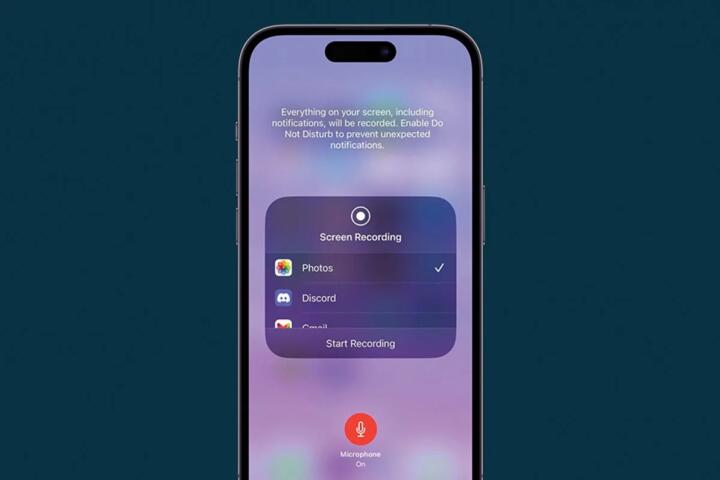
Also, permissions and privacy controls affect reliability. If the recorder loses permission mid-session, the output can stop or degrade. On macOS, screen recording permissions are granted per app; on Windows, microphone and audio permissions can be controlled by system privacy settings.
How To Choose Software
Verify Audio Routing First
Start by testing audio before you record anything you care about. Pick the microphone device you actually use, then test system audio capture by playing a short sound in the target app. If the tool offers separate toggles for “microphone” and “system audio,” record 10–20 seconds and check waveform levels in the preview or in the exported file.
On Windows, check the recorder’s audio device dropdown and the Windows Sound settings for the selected input. On macOS, confirm the app has Screen Recording and Microphone permissions in System Settings. I’ve seen setups where the recorder captured the microphone but not system audio because the user selected the wrong “default output” device.
For narration, keep microphone gain moderate. Overdriven audio compresses poorly and makes subtitles harder to read if you later generate captions.
Match Encoder To Your Goal
Choose an encoder setting that matches your editing and sharing needs. If you need broad compatibility, H.264 in MP4 is a common baseline. If you need smaller files for long recordings, H.265/HEVC can reduce size, but some older players and editing tools handle it less smoothly.
Look for options like “hardware acceleration” or “use GPU encoding.” Hardware encoding often lowers CPU load, which helps maintain stable frame rate during scrolling. In one incidental test on a laptop running macOS 14.6, enabling hardware encoding reduced dropped frames during a 1080p screen capture, while software encoding spiked CPU and introduced slight lag.
Also check the target frame rate and resolution. Recording at 1080p for a small UI can waste bitrate; 720p with a higher bitrate can sometimes look sharper for text if the tool uses good scaling.
Use Region Capture And Hotkeys
Region capture reduces file size and focuses attention. Prefer recording a single window when possible, especially for forms and dashboards. Hotkeys for pause/resume help you avoid capturing sensitive information while you switch tabs or open password managers.
Some tools include cursor highlight, click indicators, or zoom-to-cursor. These features can improve comprehension, but they also add processing overhead. If you notice stutter, disable cursor effects and record again.
As a practical aside, I once used a recorder version labeled “v3.2” that had a cursor-click overlay bug; the exported video showed delayed click markers. Testing a short clip before a real session prevented a confusing tutorial.
Plan For Redaction And Storage
Screen recordings often capture more than you intend: notifications, email previews, or patient identifiers. If your workflow involves sensitive data, plan redaction before you start. Some recorders support blurring regions in real time; others require editing after export.
If you must edit, choose a format that your editor handles smoothly. MP4 with H.264 is widely supported. If you record in WebM or MKV, verify your editor’s import behavior to avoid re-encoding surprises.
Storage planning matters for long sessions. A 30-minute capture at a moderate bitrate can still reach hundreds of megabytes. If you upload to a learning platform with size limits, you may need to lower resolution or bitrate.
Case Examples For Real Use
Bug Report With Mixed Audio
An anonymized scenario: a remote support agent records a desktop app issue. The app plays a notification sound, and the agent narrates the steps. The agent selects region capture for the app window, enables system audio, and uses a microphone for commentary.
After exporting, the agent checks the first 15 seconds for audio sync. The clip reveals that system audio is delayed by a fraction of a second, which makes the narration feel off. The agent re-runs the recording with a different audio backend setting in the recorder, then confirms sync by matching narration timestamps to the sound event.
The final deliverable uses H.264 MP4 at 30 fps, which keeps the file small enough for a ticket attachment.
Training Clip With Sensitive Fields
An anonymized scenario: a trainer creates a short walkthrough for a health portal. The walkthrough includes navigation through a page that contains personal fields. The trainer uses pause hotkeys to stop recording while entering any personal data, then resumes once the page displays non-sensitive steps.
For extra safety, the trainer records only the browser window and uses a blur tool during editing for any accidental exposure. The trainer exports a 720p version to reduce file size for learners on mobile connections.
In the review step, the trainer checks the exported file for hidden overlays like browser autofill suggestions, which sometimes appear even when the user thinks they typed nothing.
Comparison Checklist
| Parameter | What To Look For | Why It Matters | Quick Test |
|---|---|---|---|
| Audio Inputs | Separate mic and system audio toggles | Prevents silence or echo in exports | Record 15 seconds while playing a sound |
| Encoder Choice | H.264 MP4 for compatibility; H.265 for smaller files | Affects playback and editing friction | Import into your editor and scrub timeline |
| Frame Rate Stability | Consistent fps under load | Reduces jitter during scrolling and cursor moves | Scroll a page for 20 seconds and review |
| Region Capture | Window or area selection with hotkeys | Cuts file size and limits sensitive exposure | Record only the target window for a test |
| Redaction Options | Blur or edit workflow for sensitive fields | Reduces accidental disclosure risk | Check export for notifications and autofill |
Step-by-step checklist for a reliable first recording:
- Pick the capture area: window first, full screen only when necessary.
- Select audio devices: microphone and system audio, then record a 15-second test.
- Set resolution and fps: start at 720p/30 fps if you need smaller files.
- Enable cursor effects only if they improve comprehension without stutter.
- Record a short “dry run” of the exact actions you plan to show.
- Review the export for audio sync, dropped frames, and accidental sensitive content.
Common Mistakes To Avoid
Choosing a recorder without testing audio routing leads to the most frustrating failures. A clip with perfect visuals but missing system audio forces viewers to guess what happened.
Recording full screen by default increases the chance of capturing private notifications. Even if you plan to edit later, editing can miss transient pop-ups that appear for a second.
Setting an aggressive bitrate or frame rate can degrade performance. When the encoder can’t keep up, the recording may fall behind real time, and the playback will show uneven motion.
Skipping a format check causes avoidable friction. Some editors handle MP4/H.264 smoothly, while other combinations require re-encoding. If you plan to upload to a learning platform with strict codecs, test with a small export first.
Another frequent issue involves permissions. If the recorder app loses screen recording permission after a system update, the next session can fail or capture a black screen. A quick permission check after updates saves time.
FAQ
Which Format Works Best?
MP4 with H.264 usually plays reliably across common players and editors. If you need smaller files for long recordings, H.265/HEVC can help, but you should test import and playback in your target editor or platform.
How Do I Record System Audio?
Use the recorder’s system-audio option and select the correct output device in the recorder and operating system sound settings. Verify with a short test clip because system audio capture depends on OS permissions and the selected audio backend.
Why Does My Video Stutter?
Stutter often comes from encoder overload, high resolution, or cursor effects adding processing overhead. Lower resolution, reduce fps, and enable hardware encoding if available, then re-test with a scrolling action.
Can I Blur Sensitive Content?
Some recorders blur regions in real time, while others require post-editing. If your tool lacks redaction, pause recording during sensitive entry and blur any accidental exposure during editing.
What Settings Should I Use For Tutorials?
Start with window capture, 720p or 1080p depending on text size, and 30 fps for most UI tutorials. Use cursor highlights only if they remain smooth, and record a 15–30 second dry run to confirm audio clarity.
Author's Insight
Screen recording quality depends less on marketing claims and more on measurable factors: audio routing correctness, encoder load, and export compatibility. A careful workflow starts with a short test clip that exercises the same actions you plan to show, then checks sync and frame stability.
Permissions and device selection often break recordings after OS updates, so verifying screen recording and microphone permissions before a real session reduces failure risk. When file size matters, bitrate and codec choice usually matter more than resolution alone.
For health-related or other sensitive content, the safest approach combines region capture, pause hotkeys, and post-edit review for transient disclosures.
Key Takeaways
- Test audio routing with a short clip; silence or echo ruins usability even when visuals look fine.
- Match codec and container to your playback and editing needs; MP4/H.264 often reduces friction.
- Use region capture and hotkeys to limit sensitive exposure and reduce file size.
- Review exports for sync, dropped frames, and accidental notifications before sharing.