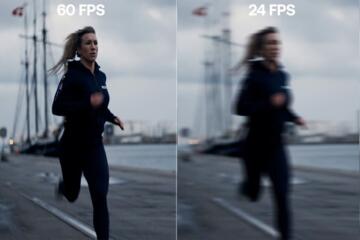
24, 30, Or 60 FPS
Frame rate (FPS) describes how many video frames are captured or played each second. In creator workflows, the choice affects motion portrayal, editing load, compression behavior, and how your footage matches the delivery target. A 24 FPS timeline often produces a film-like cadence, while 60 FPS tends to preserve motion detail for fast movement. 30 FPS sits between those looks and is common for broadcast-style delivery. The right pick depends on what you record, how you edit, and where the video will be watched.
Practical example: if you film a talking-head interview with minimal motion, 24 or 30 FPS usually looks natural and keeps data rates manageable. If you film sports, fast camera moves, or screen capture with cursor motion, 60 FPS often reduces perceived blur and makes motion edges easier to track. If you plan to deliver to multiple platforms, you may also need to match their preferred frame rates to avoid extra conversion steps.
Main Problems And Pain Points
Many creators treat FPS as a purely aesthetic choice, then discover downstream issues during editing or upload. A common mistake is choosing 60 FPS for everything, then realizing the footage is harder to grade because the codec and bit rate were tuned for a different frame cadence. Another frequent problem is mixing frame rates across clips without a plan for retiming, which can cause audio drift or uneven motion pacing.
FPS interacts with capture settings. Shutter speed (or shutter angle) affects motion blur per frame; changing FPS without adjusting shutter can change the look more than you expect. Sensor readout and rolling shutter can also change how fast motion bends, especially at higher FPS where the camera may read the sensor differently. Audio sync can shift when you record with variable frame timing or when the editor interprets metadata incorrectly.
Compression behavior matters too. Codecs often allocate bits based on temporal changes; higher FPS can increase the number of frames that need encoding, which can raise file size or reduce quality at the same bit rate. Some platforms re-encode uploads, and the re-encoder may handle 60 FPS differently from 24 FPS, which can change perceived sharpness and motion smoothness. If you’ve ever watched a 60 FPS upload and felt the motion “stutter” during playback, you’ve likely hit a conversion or playback pipeline mismatch.
One more dependency: your editing software and export settings. If your timeline is 24 FPS but you drop in 60 FPS clips without proper conforming, the editor may duplicate frames or resample time in a way that changes cadence. That’s not always wrong, but it should be intentional. I’ve seen projects where the timeline was set to 30.00 fps while the camera recorded 29.97 fps, and the mismatch showed up as a subtle audio offset after a long session.
Solutions And Advice
Match FPS To Motion Type
Pick FPS based on how much motion you need to represent. For interviews, narration, and slow camera moves, 24 or 30 FPS usually preserves a natural cadence without demanding extra data. For action, fast pans, sports, or anything with fine motion detail, 60 FPS often reduces the “smear” that comes from fewer frames capturing the motion path. If you record screen content, 60 FPS can also make cursor movement and UI transitions look less jittery.
When you choose 24 FPS, plan for a shutter that supports the look you want. Many creators use a shutter angle around 180° as a starting point, which roughly pairs shutter speed to FPS; the exact mapping depends on your camera. If you jump from 24 to 60 FPS but keep the same shutter speed, you change motion blur per frame, so the footage can look “crisper” in a way that may not match your intent.
Plan Your Timeline And Exports
Decide early whether your timeline will be 24, 30, or 60 FPS, then conform clips to that plan. If your camera records 60 FPS but your delivery is 30 FPS, you can retime by slowing down or by using frame blending depending on your editor. Frame blending can smooth motion but may introduce ghosting on moving edges, which is more noticeable on hair, fences, or fast text.
Export settings also matter. Use the same frame rate as your target delivery when possible, and confirm whether your platform expects 29.97 vs 30.00 or 23.976 vs 24.00. A small aside: in DaVinci Resolve 18 (and similar versions), the project frame rate and clip frame rate interpretation can differ if you rely on auto-detection, so check the clip properties before grading. If you’re exporting for web, test a short segment first; a 10-second export can reveal cadence issues without waiting for a full render.
Control Data Rate And Quality
Higher FPS increases the number of frames that must be encoded, so quality can drop if bit rate stays fixed. If your camera offers variable bit rate, the encoder may spend more bits on complex motion, which can still reduce quality in other segments. If you have a choice, record at a higher bit rate or a less compressed codec for 60 FPS, then verify with a frame-by-frame review on motion edges.
File size is not just storage; it affects editing responsiveness. 60 FPS footage can strain playback in some systems, especially with heavy effects or noise reduction. If your editor struggles, consider proxies or optimized media. A mild frustration many creators hit: proxies that are created with a different frame rate interpretation can lead to “correct” playback in the viewer but wrong timing in the final export.
Use Retiming Intentionally
Retiming is where most “FPS debates” become practical. If you want a 30 FPS delivery but recorded 60 FPS, you can slow 60 to 30 by dropping every other frame, which preserves cadence but changes motion smoothness. If you want a 24 FPS delivery, converting 60 to 24 requires a more complex mapping; some editors will blend frames, which can look good on smooth motion and less good on high-frequency detail.
For creators who need consistent motion feel, a simple workflow is to record at the delivery FPS when possible. If you must shoot higher FPS for safety, keep the retiming method consistent across the project. In Adobe Premiere Pro, for example, the “Interpret Footage” and “Time Interpolation” settings can change the outcome; check them before you grade, because grading can hide or exaggerate artifacts.
Case Examples
Example 1: Interview series with b-roll. A creator records interviews with a locked-off camera and minimal subject motion. They choose 24 FPS for the main talking-head shots to match a cinematic cadence, then record b-roll at 60 FPS for occasional whip pans and product movement. In the edit, they conform the 60 FPS b-roll to the 24 FPS timeline using a consistent retiming method and verify audio sync after conforming. The final export targets 24 FPS to avoid platform conversion surprises.
Example 2: Game capture and tutorials. A tutorial creator captures gameplay and cursor interactions. They record at 60 FPS because UI motion and cursor movement benefit from higher temporal sampling. Their timeline stays at 60 FPS, and they export at 60 FPS for platforms that support it well. When they later repurpose the same footage into a 30 FPS version, they generate a separate export rather than relying on a casual downconversion, then they check for frame duplication artifacts around fast text transitions.
Comparison Table And Checklist
| Goal | 24 FPS | 30 FPS | 60 FPS |
|---|---|---|---|
| Motion feel | Cadence similar to film | Balanced motion portrayal | More temporal detail |
| Editing load | Lower data rate | Moderate load | Higher decode/encode work |
| Compression risk | Fewer frames to encode | Usually manageable | Quality can drop at fixed bit rate |
| Best use | Interviews, narrative | General web delivery | Action, UI motion, fast pans |
Step-by-step checklist before you record
- Write down the target delivery frame rate(s) you plan to export (for example, 24, 30, or 60) and whether you need 23.976/29.97 variants.
- Choose FPS based on motion type, then set shutter speed or shutter angle to match the look you want per frame.
- Confirm your camera’s codec and bit rate mode for that FPS setting; higher FPS often changes how the camera allocates compression.
- In your editor, set the project frame rate to match the intended export, then check clip properties for frame rate interpretation.
- Export a 10–20 second test segment with motion edges (hair, text, fences, UI) and review it at full resolution.
Common Mistakes
Creators often ignore frame rate variants like 23.976 vs 24.00 and 29.97 vs 30.00. When the editor silently converts between them, the timeline can drift over long sessions, and audio sync issues can appear late. Another mistake is assuming that “60 FPS looks smoother” without checking motion blur settings; if shutter speed stays too fast, the motion can look staccato rather than smooth.
Some projects suffer from inconsistent retiming. If one clip uses frame blending and another uses frame dropping, the motion cadence changes across cuts, which viewers notice even when they cannot name it. Noise reduction and sharpening can also interact with FPS; temporal filters may behave differently at 24 vs 60 FPS, changing grain texture and edge halos.
Finally, creators sometimes export at the right FPS but with a mismatched time base in the container or player settings. A quick test is to re-import the exported file into the editor and confirm the playback cadence. If the export plays differently than the timeline, the issue is usually in export settings or platform re-encoding, not in your original footage.
FAQ
Should I Record At 60 FPS For Everything?
Record at 60 FPS when your footage contains fast motion that benefits from extra temporal sampling. For static interviews and slow camera work, 24 or 30 FPS often avoids higher data rates and reduces compression pressure.
Does 24 FPS Always Look More Cinematic?
24 FPS often matches a film-like cadence, but the look depends on shutter settings, lens motion blur, and grading choices. A 24 FPS clip with an unusual shutter speed can look “off” even if the FPS is correct.
What Happens When I Convert 60 FPS To 30 FPS?
Most conversions either drop frames or blend frames. Dropping keeps cadence but can reduce smoothness, while blending can smooth motion but may create ghosting on moving edges.
Why Does Audio Drift After Editing?
Audio drift usually comes from frame rate interpretation mismatches, variable frame timing, or incorrect metadata handling during import. Confirm the clip’s frame rate in the editor and check sync after conforming.
Which FPS Should I Export For Web Uploads?
Export at the frame rate you want viewers to experience, and match the platform’s common expectations when possible. If you need multiple versions, export separate files rather than relying on casual downconversion.
Author's Insight
FPS choices affect more than motion smoothness; they change how many frames your codec must encode and how your editor retimes time. Shutter speed (or shutter angle) and rolling shutter behavior often influence the perceived motion look as much as FPS itself. A practical workflow is to decide the delivery cadence first, then record at that cadence or at a higher cadence with an intentional retiming plan. When results look wrong, the cause usually sits in frame rate interpretation, shutter settings, or export settings rather than in “bad taste” or viewer preference.
Key Takeaways
- Use 24 FPS for narrative-like cadence and lower data pressure; use 60 FPS for fast motion and UI/cursor detail; use 30 FPS as a middle ground.
- Match shutter settings to your FPS choice so motion blur per frame stays consistent with your intended look.
- Set your editor project frame rate intentionally, confirm clip frame rate interpretation, and export a short test segment before committing.
- Convert FPS with a planned method and keep retiming consistent across cuts to avoid cadence shifts.